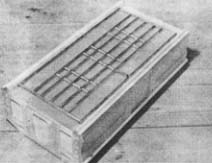
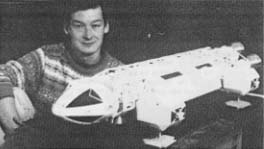
 ABOVE: Plasticard and perspex created the basic shape of the pod. RIGHT: David at work on the EAGLE pod. |

|
|
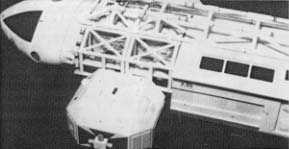
POD: One day I hope tohave a set of different pods, but for the time being I've just settled for building the standard type. To save time working out a blueprint I just borrowed the original studio model and copied it. I traced around the end of the pod and cut out two copies from 4mm perspex sheet. The recessed doorways and hatches were drilled and cut out, then blanked off and detailed with plasticard. As the pod is basically a simple box structure, it could be blocked out very quickly using more perspex sheets. The side walls consisted of two layers, with the design cut out of the surface layer. More detail was then made using ribbed and plain plasticard, as well as a bit of P38 filler. The window areas were added after painting was completed and consist of just clear perspex painted black on the inside. The bottom of the pod is a separate piece that simply screws into position. The brasswork is only decorative so I simply superglued it all into position, this time using a lot of the thin walled pipe from model shops, mainly to keep the weight down. I didn't have to make the four aluminum thrusters because they are original parts from a scrapped pod that are just screwed into place. It seemed a rather fitting way to finish a new replica model by attaching some "real" bits of EAGLE to it. DETAILING: The model was now complete but it didn't look very good with its pristine white paint job. The first task was to add all of the coloured tapes |
to the frame, then all the panel lines and finally all the weathering. Some of the weathering on the pod was done by dusting on grey primer spray paint, but I settled for pencil on most of the model. The original models seem to be covered in lots of grey panels. While this looked good on film, I didn't like it in real life as it's a bit garish. I used matt white panels to break up the overall satin finish. The pencil weathering really made the model look good (although it tends to disappear in photographs), but it didn't want to stay on the shiny paint surface. As a result, I had to scuff the designated surface areas with a very fine wet & dry sandpaper which not only allowed the pencil to adhere, it also made the weathered appearance more realistic. Final detailing consisted of Letraset and selected transfers from a variety of model kits. CONCLUSION: I actually worked on this model over a four year period and although I've always only wanted a 44" EAGLE, I now realixe that I'll probably have to build the 22" version as well. The reason is that you just can not handle a 44 inch long model easily........OK, OK, I admit, you can't play with this size of model, especially as the brass I used was thick walled (wrong) and sometimes solid (wrong again). As a result, the model weighs a bloody ton - but at least it does look good! |
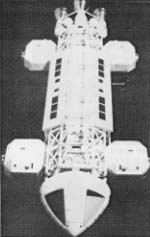 The fully completed 44 inch EAGLE from "Space 1999." |
|
|
|

|
|